GPOs are created in a central manner and are stored on all domain controllers in a forest. GPOs can be accessed via Active Directory Users and Computers:
- Click Start.
- Click All Programs.
- Select Administrative Tools.
- Pick Active Directory Users and Computers.
- Expand to an OU.
- Right-click and choose Properties.
- Select the Group Policy tab. If you have the GPMC loaded, it will prompt you to open it.
GPOs can also be accessed through the Group Policy Management console:
- Click Start, Run, type gpmc.msc, and then press Enter. If Run is not available from the Start menu, it can be accessed by pressing the Windows and R keys at the same time.
The Group Policy Management Console is preinstalled on Vista.
Introducing the Group Policy Management Console (GPMC)
The release of the GPMC provided huge improvements in the creation and management of GPOs. Prior to the GPMC, an administrator had to open each GPO in the editor and examine all possible settings to determine which settings had been changed from the defaults. In the GPMC, you can view all the unique settings of a given GPO via the following steps:
- Launch the GPMC (Start, Run, gpmc.msc).
- Expand the Forest container.
- Expand the Domains container.
- Expand the Domain Object that holds the GPO you are interested in.
- Expand Group Policy Objects.
- Left-click the GPO in question.
- Click the Settings tab in the right pane.
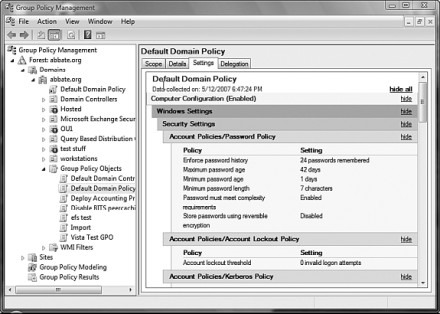
GPMC will show Generating Report and then the containers that are modified. Click Show All to see all settings contained in the GPO, as shown in Figure 1.
Figure 1
The GPMC is also useful for backing up and restoring GPOs. This should be used whenever a GPO is to be modified. This way, if the GPO causes unwanted issues, an administrator can restore the previous version of the GPO to return systems to their previous configuration. To back up a GPO with the GPMC, follow these steps:
- Launch the GPMC (Start, Run, gpmc.msc).
- Expand the Forest container.
- Expand the Domains container.
- Expand the Domain Object that holds the GPO you are interested in.
- Expand Group Policy Objects.
- Right-click the GPO in question and choose Backup.
- Browse to the location where you want to store the backed up GPO and enter a description. Click Back Up.
- When the backup is completed, click OK.
To restore a GPO with the GPMC, follow these steps:
- Launch the GPMC (Start, Run, gpmc.msc).
- Expand the Forest container.
- Expand the Domains container.
- Expand the Domain Object that holds the GPO you are interested in.
- Expand Group Policy Objects.
- Right-click the GPO in question and choose Restore from Backup.
- When the wizard launches, click Next.
- Browse to the location of the backup and click Next.
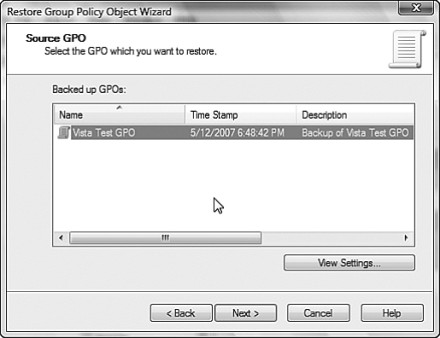
- Choose the backup you want to restore (Note: this is where entering a description was helpful) and click Next.
- Click Finish and the restore will begin.
- When the restore has completed successfully, click OK.
Figure 2
Creating a New GPO in the GPMC
The GPMC is the logical place to create new GPOs. Generally speaking, the creation of a GPO should coincide with the desire to automate some specific configuration across multiple machines. This means that the person creating the GPO should already know what settings to assign to a given GPO.
To create a new GPO, follow these steps:
- Launch the GPMC (Start, Run, gpmc.msc).
- Expand the Forest container.
- Expand the Domain container.
- Expand the Domain Object that holds the GPO you are interested in.
- Right-click Group Policy Objects and choose New.
- Enter the name of the GPO you want to create (use a descriptive name) and click OK.
This will create a new, empty GPO in the management console. To modify settings within the GPO, you need to use the GPO Editor. Right-clicking the new GPO and choosing Edit will launch the GPO Editor.
Using the GPO Editor
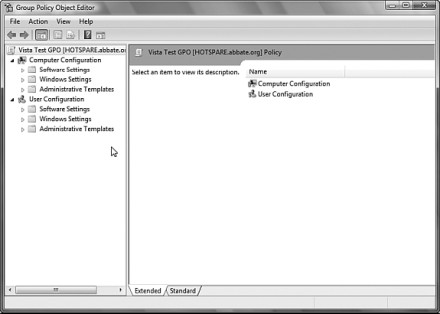
The GPO Editor that is triggered via the GPMC is the same editor originally used since Windows 2000. Not much has changed. The editor expresses the GPO in two sections, Computer and User settings, as shown in Figure 3. Although an administrator can set both user and computer settings in the same GPO, it is considered a best practice to limit a given GPO to either User or Computer settings. This is related to the way GPOs are linked and is discussed in more detail later in this chapter.
Figure 3
The editor allows the administrator to browse through the available configuration settings in a graphic format for computer support. For example, you could expand User Configuration, Administrative Templates, System, and Windows HotStart to have the ability to turn off Windows HotStart. Because this is a new GPO setting, you might wonder what Windows HotStart is. By selecting Turn Off Windows HotStart, you will see that an explanation of the setting has appeared to the left of the setting. To save space in the window, you could click the Standard tab at the bottom of the screen
